Prepearing for GitHub certification - Manage GitHub Actions in the enterprise
Table of Contents
- Prepearing for GitHub certification - Manage GitHub Actions in the enterprise
Manage actions and workflows
At enterprise level
Configure a GitHub Actions use policy
- GitHub Actions workflows contain actions, sets of standalone commands to be executed within the workflow
- Can create own action or use public ones
- Due to that is important to use policies for workflows and actions
-
There are several options for Enterpirse cloud or Enterprise Server if GitHub Connect is enabled
- To Confgire policy navigate to your enterprise account and then to Policies > Actions
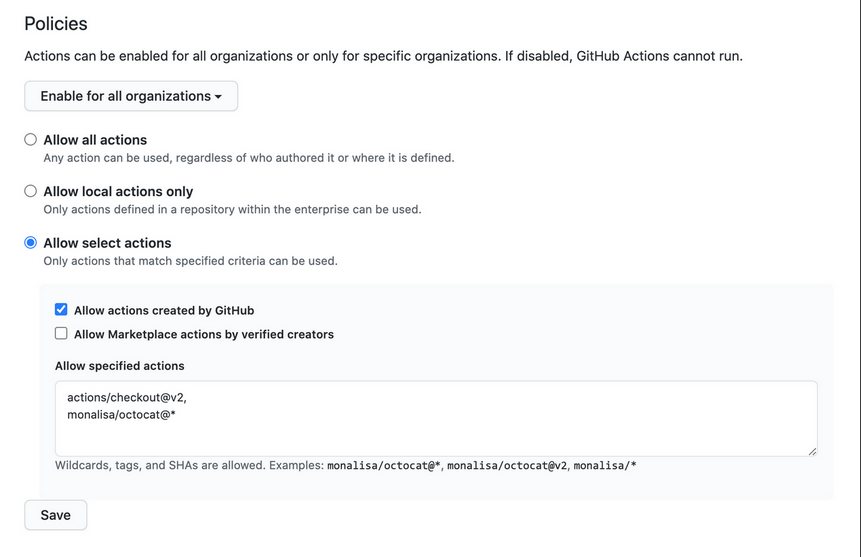
Action Policies
- __Enable for all organizations__ - decided which organizations in your enterprise can use GitHub Actions
- Policies can be set on different levels
- allow all action
- allow local actions only
- allow select actions
- Allow actions created by GitHub
- Allow marketplace actions by verified creators
Manually sync public actions for Enterprise Server
- Official GitHub-Auhtored actions are bundled in Enterprise server ( are captured at a point in time from the GitHub Marketplace)
- They include
actions/checkout,actions/upload-artifact,actions/download-artifact,actions/labelerand variousactions/setup-actions etc - To see offiacl actions browes to your instance: https://HOSTNAME/actions
- Can configure Enterprise Server to automatically access the public actions available in the GitHub Marketplace and to configure a use policy for them
- If stricter control is required then use GitHub
actions-synctool: Possibility to manually download and sync actions into your enterprise instance
At organization level
Document corporate standards
As best practises GitHub recommends to document in wiki or MD file in repo
- Repositories for storage
- Files/folders naming conventions
- Location of shared components
- Plans for ongoing maintenance
- Contribution guidelines
Create workflow templates
- Supported in Enterpise Cloud and Enterpise Server
- Users need write access to an organization
.githubrepository to create workflow templates -
Workflow templates can be used to create new workflows in public and private repositories of the organization
- Need repository
.github-> and directoryworkflow-templates - Need a
ymlworkflow file - Need a
jsonmetadata file that describes how the template should be presented
__NOTE:__
- The metadata file must have the same name as the workflow file. Instead of the .yml extension, it must be appended with .properties.json. For example, a file named octo-organization-ci.properties.json contains the metadata for the workflow file named octo-organization-ci.yml.
- Sample workflow:
name: Octo Organization CI


on:

  push:

    branches: [ $default-branch ]

  pull_request:

    branches: [ $default-branch ]


jobs:

  build:

    runs-on: ubuntu-latest


    steps:

      - uses: actions/checkout@v2


      - name: Run a one-line script

run: echo Hello from Octo Organization- Sample metadata json file
{
    "name": "Octo Organization Workflow",
    "description": "Octo Organization CI workflow template.",
    "iconName": "example-icon",
    "categories": [
        "Go"
    ],
    "filePatterns": [
        "package.json$",
        "^Dockerfile",
        ".*\\.md$"
    ]
}- Metadata files use the following parameters
| Parameter | Description | Required |
|---|---|---|
| name | The name of the workflow template. | Yes |
| description | A description of the workflow template. | Yes |
| iconName | The name of the icon to use for the workflow template. Must be an SVG icon of the same name, and must be stored in the workflow-templates directory. | Yes |
| categories | Defines the language category of the workflow. | No |
| filePatterns | Enables the template to be used if the user’s repository has a file in its root directory that matches a defined regular expression.. | No |
- Once the workflow template is created, it can be used to create new workflows in the organization’s repositories (under Actions > New workflow > Workflows created by _your_organization_name.).
Manage runners
Choose an appropriate runner for your workload
-
NOTE: GitHub-hosted runners are only available for Enterprise Cloud. If you have an Enterprise Server instance, then ignore this section.
- GitHub-Hosted runners
- Are managed and maintained by GitHub
- Self-hosted runners
- Need to manage OS and Software
- You are responsible for maintaining it
Configure access to self-hosted runners
- Can create a Group of self-hosted runners to control access who can use it (either on Enterprise or Organization level).
- Comes in handy for cases where you need to restrict access to self-hosted runners to specific organizations or users
- Good to mitigate risk
- Sample scenario
- You want to authorize only specific organizations in your enterprise instance to deploy code to your production environment. In order to achieve this, you could create a group containing all the runners deploying code into production at enterprise level and restrict the access to the group to the specific organizations authorized to deploy code.
- To create groups Enterpirse leve:
- navigate to your enterprise account and then to Policies > Action
- Self-Hosted runners section, Click Add new > New group.
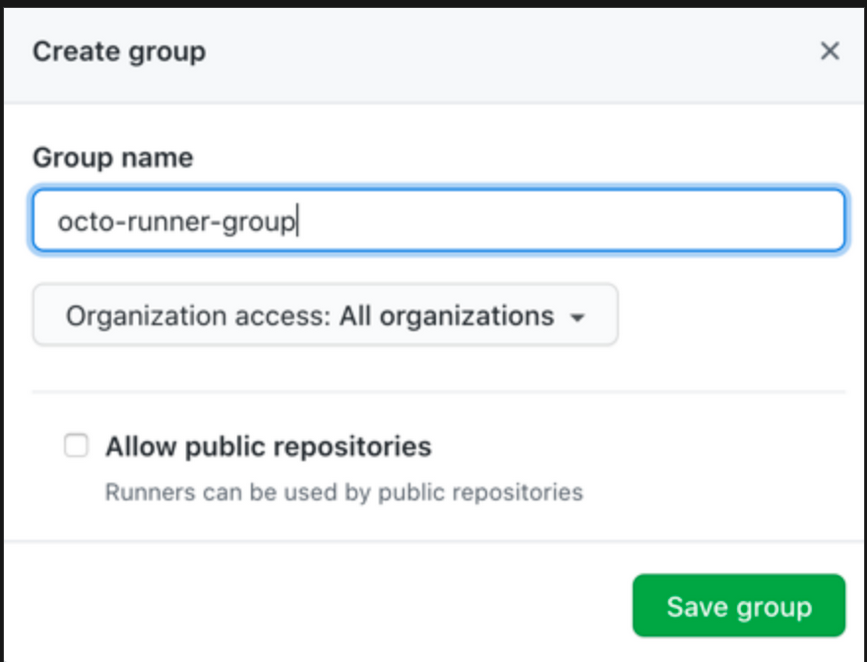
- To create groups Organization leve:
- navigate to your organization Settings and then to Actions
- Self-Hosted runners section, Click Add new > New group.
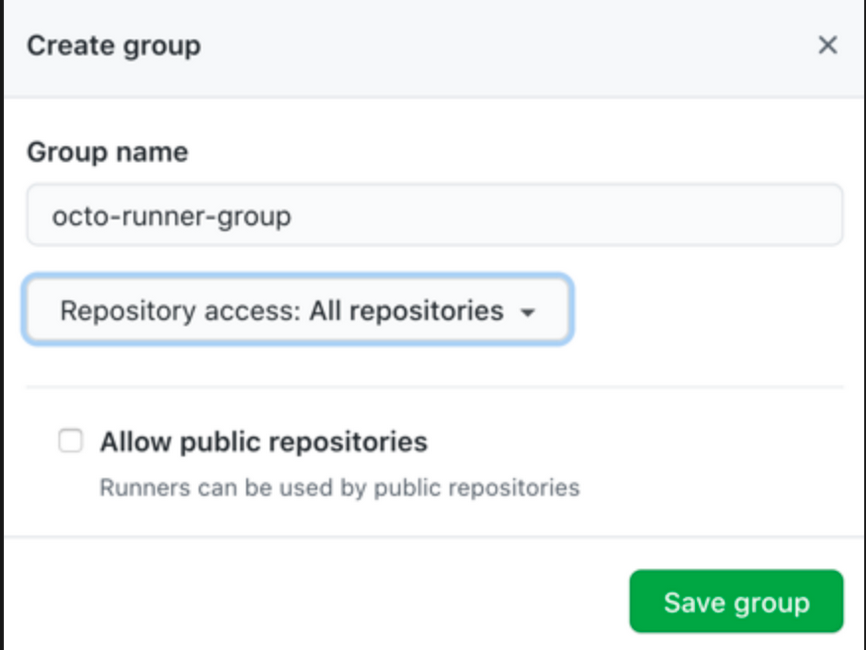
- By default all runners are assigned to the group
defaultwithin the enterprise or organization - Runners can only be in one group at a time, EC and ES enable to more runners from default group to another group
Configure self-hosted runners for enterprise use
- Customize your self-hosted runner either with:
- Labels - Come in handy when you need to run jobs on runners that have specific capabilities.
- Proxy servers - communicate with GitHub via a proxy. Can be configured with
.envfile on server link - IP Allowlists
Lables
- Enterprise Cloud and Enterprise Server offer you the possibility to create and add custom labels to your runners.
- Self-hosted runners automatically receive default labels
- This Indicates the the operating system and hardware architecture of the runne
| Label | Description |
|---|---|
self-hosted |
Default label applied to all self-hosted runners |
linux, windows, or macOS |
Applied depending on the runner’s operating system. |
x64 , ARM, or ARM64 |
Applied depending on the runner’s hardware architecture. |
Proxy servers
- If runner is to communicate with GitHub via a proxy server, then both EC and ES enable you to change proxy config
Monitor and troubleshoot self-hosted runners
The main steps you can take when troubleshooting a self-hosted runner are:
- Check the status of the runner in the GitHub Actions settings of the organization, repository, or enterprise where your self-hosted runner is registered (under Actions for an organization or repository, under Policies > Actions for an enterprise).
- Review the activities and automatic updates of the runner in the
Runner_files in the_diagfolder. - Review the status of the jobs the runner executed in the
Worker_files in the_diagfolder.
Manage encrypted secrets
Secrets
- Secrets are encrypted environment variables you can create to store tokens, credentials or any other type of sensitive information
- Available to use in the workflows and actions that have access to the organization, repository, or repository environment where they are stored
Access encrypted secrets within actions and workflows
-
{% highlight yml %} ${{ secrets.MY_SECRET }} {% endhighlight %}
- Access in yml
-
To access an encrypted secret in a workflow, you must use the context of the secret in your workflow file. For example:
{% highlight yml %} steps:
- name: Hello world action with: # Set the secret as an input super_secret: ${{ secrets.SuperSecret }} env: # Or as an environment variable super_secret: ${{ secrets.SuperSecret }} {% endhighlight %}
- Access in Action
- To access an encrypted secret in an action, you must specify the secret as an input parameter in the action.yml
inputs:

  super_secret:

    description: 'My secret token'

    required: true
Excercise
Here is an excerise to put the knowledge you have learned in this guide to use.